
Meringue is one of those Achilles' heel things for a lot of bakers. So many people have trouble with it or flat out avoid it because they are afraid of it. I'm here to tell you that it doesn't have to be scary. It's actually a really simple thing to make.

All of us bakers have something, or sometimes many things (guilty), that trip us up. I guess I was lucky in that I took to meringue pretty quickly. I had it collapse on me once and I knew why and made sure never to make this mistake again. Let me share with you the tips and tricks to getting a perfect meringue every time.

Plastic bowls can store the grease or water in their pores, so no matter how many times you have dried it, it will still be present and can spoil your meringue. Now, I've made meringue many times in plastic bowls (before I finally bought a glass one) that have been air dried. But that said, the one time it did collapse in me was due to using a plastic bowl that had just been washed and dried. Meringues hate moisture. So if you're having trouble with meringue, it's best to steer clear of any extra cause for disaster. The same rules of cleanliness go for your beaters. They must be squeaky clean and thoroughly dried.

This also means you need to avoid getting any yolk in your egg whites. The tiniest amount can wreak havok, so if you're not great at separating eggs, take it slow. If you're using more than one egg, separate the egg into two smaller bowls and transfer the whites across. There's nothing worse than messing up the very last egg and spilling yolk into a bowl of 4, 6 or more otherwise perfectly separated egg whites. Also keep in mind that egg whites increase in volume 6-9 times when beaten, so use a large enough bowl. 4 egg whites is all this 1 litre bowl of mine will handle.
For the best meringue, I like to use older egg whites, so at least 3-4 days old. Older eggs will yield more volume, fresher eggs will be more stable, so choose your poison based on your preference. It's also better to have them at room temperature. Cold eggs are easier to separate as the whites are stiffer, so if you have trouble with that stage, let the whites come to room temperature after you have separated them.
Once you have achieved that, you've ironed out most of the problems that occur. The other major hurdle is knowing when to beat and how long to beat. This will depend on what your recipe says, so pay careful attention to the wording. Some will ask you to beat until foamy, others to soft peaks, others to stiff peaks. Some will ask you to beat the sugar in at either the soft or stiff peak stage. It's impossible for me to show you the details of every possible combination, but as long as you can recognise what constitutes each stage, you will have no problem following the recipe.

Once you begin beating, your egg whites will increase in volume rapidly.
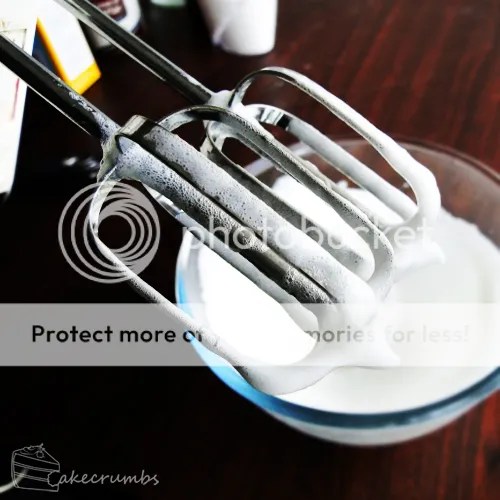
You will notice they get to a stage where they are really bubbly (Picture 3); this will be particularly prevalent around the exterior of your bowl where your mixer doesn't reach. When your beaters are lifted, the whites will fall in ribbons and will not hold any shape. Your beaters will be covered in tiny bubbles.
As you continue to whisk, the egg white will begin to hold shape. Soft peak isn't far away.
Once you start to see ribbons forming that don't immediately disappear, you're hitting soft peak. If you lift the beaters out and turn them upside down, the little peak will fold and droop, but maintain its shape. Another way to test is to watch how the whites fall when you lift the beaters: they will no longer stream down, but will still fall from the beaters and hold their shape on the surface of the mixture.

This was the point in my recipe where I needed to add sugar. Some will ask you to do it at stiff peak stage. Either way, add the sugar one tablespoon at a time and thoroughly incorporated before adding the next. Too much too soon can cause it to collapse. The sugar needs to completely dissolve. If you're not sure, rub the meringue between your thumb and finger. If it feels really grainy, you need to keep beating.

I kept beating this through to stiff peak. When you lift the beaters the mixture will no longer curl over but hold it's shape. It will likely not fall from your beaters any longer, either. The peaks formed in the bowl from lifting your beaters will also stand stiff and the mixture will not move if you tilt the bowl. If you've properly achieved stiff peak, you can turn the bowl upside down and it will not drop: however, that's a really messy way to test for stiff peak if it goes wrong!

Now that we've covered the stage of meringue, let me share with you one of my favourite types of meringue:
Swiss Meringue
I use this all the time when I'm creating a recipe, telling a recipe I'm following that I know better, baking meringue for the hell of it, or using it to pipe. I used it to make quenelles on this cake because I trusted the outcome better than normal method of doing it. This bakes a lovely, glossy meringue that holds it's shape really well. But the best part is, you don't even have to think about it. Swiss meringue is my comfort zone.
Cooking is all about ratios. If you remember the ratios you can create your own recipes. Meringues are easy to remember: you add 1/4 cup of castor sugar for every one egg white.
I was using two egg whites here, so half a cup.

Swiss meringue is different in that you add the sugar to the unbeaten egg whites straight away (and any cream of tartar you wish to use). Give it a stir with a whisk to incorporate and break up the egg white, then put it over a pot of gently simmering water and continually whisk (you need not whisk vigorously – you are not trying to add volume here, just keeping the heat evenly distributed and helping the sugar dissolve).
If you have a stand mixer, use that bowl for this stage. (I don't, waaah).

If you want to be pedantic, use a candy thermometer and remove it from the heat when it reaches 60°C (140°F). At this point, they are pasteurised (and deemed "safe'). But the lovely part is that it is at this temperature (or a little past this) that the sugar completely dissolves. You will see the sugar disappear and the whites become clear as you are whisking. Begin testing the whites by rubbing a little between your thumb and finger: If it's still grainy, keep whisking. If it feels smooth, remove it from the heat.

Now here's the best part: all you have to do is whisk it for 10 minutes. Start at the lowest speed and gradually increase. My hand held has 5 speed settings, so I increase the speed every 2 minutes. This mixture for me usually hits that perfect stiff peak stage at dead on 10 minutes, but sometimes with smaller batches it's as early as 8, so keep an eye out and stop the beaters to test if you aren't sure.
If you have a stand mixer, not only will you not have to stand there feeling like a human version of one, but the mixture will hit the stiff peak stage at about the exact time your bowl feels cold to touch again, so you can use this as an additional guide.

Here's mine at stiff peak having a bad hair day.

The final point some people have trouble with meringues is in baking. There are too many different ways to bake a meringue that it's beyond the scope of this post to cover in depth, but here are some tips for baking:
- If you want a crisp exterior, meringues are best baked at a high temperature quickly at the beginning, then reduced to a lower temperature and baked for longer to give a marshmallowy interior
- If meringue is weeping it is under-cooked.
- Beading on the surface of your meringue is a sign it is over-cooked
- Don't open the door during the first half of baking time to avoid cracks appearing in the meringue
- Cool meringues inside the oven. Don't remove them from the baking tray until they have completely cooled. Moving meringues before they are cool can lead to the bottom sticking to your tray/baking paper and collapsing/cracking.
- Avoid cool drafts of air when cooling the meringue; the sudden change in temperature will cause it to shrink.


Great tutorial! A bit of a science lesson there too. 😉
Baking is science. 😉
Thanks for this tutorial! I especially love that you showed the different stages of meringue. Also, thank you for the information on the 1 egg white : 1/4 cup sugar ratio. Sometimes when I use recipes that calls for one egg yolk, I’m like, what do I do with this one egg white? Also, since my oven is tiny, using only one egg white means I can bake a manageable number of meringues at one time! Yay!
I’m glad it helped! It’s so much easier in the kitchen when you can remember rations. I really should make a habit of learning more of them.
This is great, thank you! My macarons fail 2/3 of the time I make them, and now I think I know why — no one ever told me about the thing with plastic bowls!
Also, as someone already mentioned, the rations thing is cool. I only know the rations for a very simple and basic cake…somebody should make a book full of tables about rations in cooking!
I’m glad it helped! I agree re: the ratios, I wonder if there is a book on them. Maybe I should do some research and write a post on ratios.