
Spring is undoubtedly my favourite time of the year. It would be enough that the weather is generally just perfect so much of the time. But the way the entire landscape transforms into an array of colourful blooms is just the icing on the proverbial cake. Its all the motivation I need to get out into the garden and start working.

The house my partner and I recently moved into has two large magnolia trees in the garden. As someone who is pretty passionate about having a predominantly Australian native garden I had considered replacing them. But the first spring they bloomed was all the convincing I needed to let them stay. They couple of weeks of colour the bring is more than worth it. This year when it came time for them to bloom I was inspired to use it in a cake somehow.
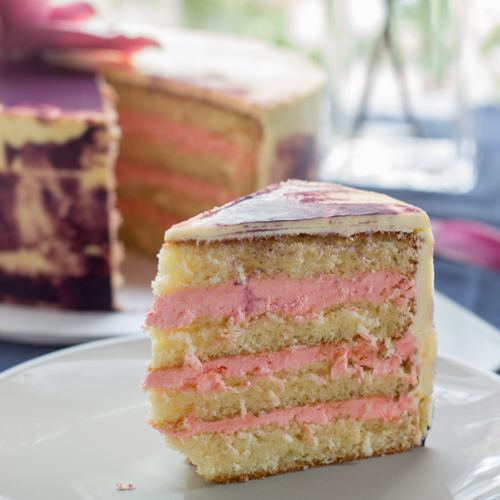
I didn’t exactly have an occasion to bake for, so I went for a simple enough sponge that I could send with Cam on the train into work.

I started with a basic sponge, baked in two separate springform tins to make levelling much less of a chore later.

In between those I layered it with a raspberry white chocolate cream. The cake was going to be at room temperature for a long time, so I wanted something that was stable. You could of course leave out the white chocolate if you don’t want such a stiff filling.

While they were baking I got to making the magnolia flower. I used a rose petal cutter as a base and then thinned the edges out into a more magnolia shape. I didn’t want to put any wire or inedible components in a cake made for a work crowd, so all the petals were sculpted and left to dry individually. This definitely made for a harder assembly later and required a lot of pre-planning when shaping the petals.

I used a combination of paintbrush and airbrush to paint the petals and stamen. Then I glued them to each other using royal icing.

It took me so long to make the flower and almost all the detail was hidden, so have another gratuitous photo of it.

The rest of the cake I covered in a swiss meringue buttercream. I had a tiny amount of buttercream left at the end, so I tinted it purple and decided to have a go at patterning the icing with a scraper.

I’m pretty fond of sharp-edged cakes and even more so ones that leave the fondant behind. I’d like to spend a lot more time practising this instead of relying on fondant for a clean exterior.

The cake was very well received. Cam alleviated my nervousness about serving cake to a new social crowd by texting me the kind reactions all day.

Here’s the recipe for the sponge itself.
Magnolia Sponge Cake
A light classic sponge filled with raspberry buttercream and coated in swiss meringue buttercream.
Note: The filling in the sponge is quite a heavy set thanks to the white chocolate. Perfect if you need a very stable cake, but if you prefer a more creamy centre feel free to omit the white chocolate. Swiss meringue buttercream is preferably made using a stand mixer, but can be beaten by hand.
Ingredients
Classic Sponge Cake
-
1/3 cup (50g) plain flour
-
1/3 cup (50g) self-raising flour
-
1/3 cup (50g) cornflour
-
1/4 teaspoon salt
-
4 free range eggs, at room temperature
-
2/3 cup (150g) caster sugar
- 1tbs vanilla extract
Raspberry White Chocolate Buttercream
- 300g unsalted butter, room temperature
- 2/3 cup icing sugar
- 1tsp raspberry flavouring (i used Queen brand)
- 125g white chocolate, melted
Swiss Meringue Buttercream
- 3 egg whites, room temperature
- 170g caster sugar
- 190g unsalted butter, room temperature
- pinch of salt
- 1tsp vanilla extract
Directions
Classic Sponge Cake
- Grease and line 2 approx 20cm cake tins. Preheat oven to 180°C (160°C fan-forced/355°F).
- In a medium bowl, sift together the flours and salt. In a large bowl, beat the eggs, sugar, and vanilla for approximately 6 minutes, or until mixture is pale and tripled in volume.
- Gradually fold the flour mixture into the eggs a third at a time, until just combined.
- Divide the batter between the two cake tins and bake for 20 minutes. To test, cake should have shrunk away from the side of the tins and will spring back when lightly poked on the surface. Allow to cool for 15 minutes before turning onto a wire rack to cool completely.
Raspberry White Chocolate Buttercream
- Beat the butter, icing sugar and flavouring together in a bowl until light and creamy.
- Add the melted chocolate to the remaining buttercream and whip to combine.
Swiss Meringue Buttercream
- In a large heatproof bowl, combine the egg whites and sugar. Place the bowl over a saucepan of simmering water and stir with a whisk until sugar has dissolved. You can test this by rubbing a small amount of egg white between your thumb and finger: you should feel no sugar grains. Alternatively, the mixture will reach 55°C.
- Remove from the heat. Whisk the mixture for 10-15 minutes, or until thick and glossy. The mixture will have reached room temperature when ready (the bowl will be cool to the touch).
- Ideally using a paddle beater, add the butter a little at a time and beat well after each addition. Allow the butter to be completely incorporated before adding the next potion. If mixture appears to split, never fear! Just increase your mixers speed to high and continue to beat until smooth again.
- Beat in the vanilla extract. You may colour the icing here if desired as well.
Assembly
- Slice each sponge cake in half lengthwise. Place the first quarter on a cake board.
- Divide the raspberry buttercream into thirds. Spread the first third of the icing onto the sponge. Top with another layer of sponge and repeat until all 4 layers of sponge are assembled.
- ‘Crumb coat’ the cake by covering it with a very thin layer of swiss meringue buttercream. Allow this layer to set before covering it with the rest of the buttercream. If you wish to add the dual-coloured effect, reserve a tiny portion of the buttercream. Tint it your desired colour while waiting for the external buttercream later to set. Dollop the coloured buttercream around the cake and used a palette knife or scraper to spread it around the cake.


I love your blog. It’s the first baking blog I started reading, and I was so, so sad when you stopped posting! I would still regularly browse because the stuff you made was too beautiful to stop looking at… and now you’re posting again!! Agh, I’m so happy!!! I hope to be a baker like you one day! Thank you for all of the inspiration! -Key, From California 🙂
Thank you so much. Your message means more to me than I can convey in words. ♥