
This tutorial will show you how I created the flower used for the topper on my birthday cake. This technique is so unbelievable easy that anyone can do it. And I mean anyone.

This makes use of an age-old technique that has been used in craft projects to create a whole plethora of hollow, spherical objects. Most of us have used this to create papier-mâché creatures or ornaments at some point in our lives, so translating this process to the world of edible creations is a small step.
This technique can be used not just for flowers, but also for making edible dessert cups.
What you will need:
Tempered Chocolate
Food colouring, preferably powdered
5 inch latex balloons, washed and dried
Baking paper
Scissors
Piping bag
Optional:
Balloon pump
Vodka
Chocolate transfer sheets
Some notes before we begin. If you do not want to temper your chocolate that is fine. But tempered chocolate will dry at room temperature within 5 minutes, and will dry without streaks or discoloration. If you don't temper your chocolate, you can put these in the fridge to set. I prefer to avoid this as your chocolate can sweat when removed from the fridge, especially if it's a warm day.
Make sure you get good quality balloons; thin balloons may pop from the heat. I also recommend using a balloon pump for this for two reasons: it's easier to regulate the size of the balloons to achieve appropriate spacing between petals, and good quality 5 inch balloons are a nightmare to blow up without one if you want your eyes to remain in your head!
Okay. Let's begin!
First, you want to temper approximately 300-400g of your base colour chocolate. I used dark chocolate here. Pour this into a wide bowl and wrap the bowl with a tea towel to preserve warmth. You also need around 100g of your highlight colour chocolate. I used white chocolate and died half of it magenta.

Blow up your balloons to varying sizes make your flower. I recommend doing 10 balloons: 5 sizes from small to large, with a duplicate of each in case of breakage. As you're inflating the balloons, be mindful of the spacing between the petals. You don't want a bunch of similar size balloons.
Take a teaspoon and swirl some of your highlight chocolate onto the surface of your base coloured chocolate. You will need to repeat this for each petal.
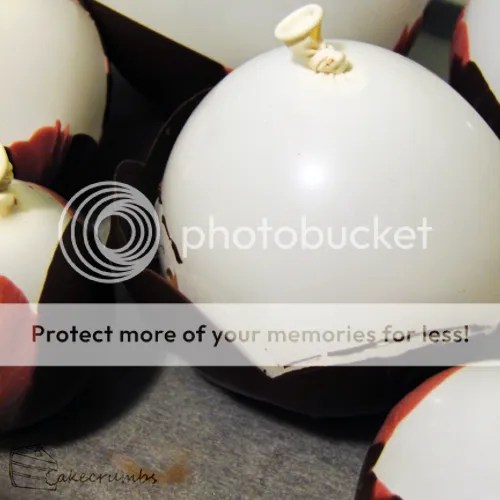
Start with your largest balloons first (I'll explain why later) and, holding it firmly by the neck, gently dip it into the chocolate keeping in centred. Don't dip it too deeply or else you will go through your lighter coloured chocolate and the outside of your petal will only feature your base colour.

It is then as simple as rocking the balloon in four directions: north, south, east and west. Make sure you cover the balloon to the same height on each of the four sides.

Lift your balloon and shake it up and down to get rid of the excess.

When no more chocolate drips off, place it onto your baking paper. When placing your balloon, ensure it centred so that the "foot" that develops at the bottom of the petal is even. You can hang the balloons while the chocolate dries if you wish it to be foot-less, but I find having it with the foot aids assembly.

When you get to the smallest balloons, dip them so the chocolate comes further up the sides of the balloon to create the centre bud. Just make sure there is enough room on your second and third smallest petals to fit the next size down inside it.

This is why you want to begin with your largest balloons first. When you first begin to coat your balloons, your chocolate will still be really runny and your petals will be smoother. I like to have more character in the centre buds, rather than the outside. By the time you get to your smaller balloons, your chocolate will begun to have thickened as it cools (this will happen much more quickly with tempered chocolate) and you can achieve these really funky shapes. It takes some practise learning how to place your highlights of chocolate to achieve this look, especially to achieve the embossed effects, you just need to be able to envisage the process. Remember that the pattern you drizzle with your highlight colours onto your base colour will be what contacts the surface of your balloon, and so will be the pattern visible inside your petals. The effect on the outside comes from the way the chocolate pulls down the sides of your balloons as you rock them into and out of the chocolate. Imagine this as you are placing your highlights and think about where you need to put your chocolate in order to create the most decorative effects.

Now for the stamens. You have two options. If you want them to be round, rather than having the tell-tale signs of being piped onto a flat surface, pipe them into vodka that has been sitting in the freezer for a while.

I opted for a more colourful approach and piped them onto a chocolate transfer sheet.

Once your petals have set, take your scissors and snip a tiny hole in the balloon just underneath the knot (where the latex is not stretched). This will avoid popping the balloons, something that could send bits of chocolate flying all over your kitchen. I've accidentally popped one of these before and the petal stayed in tact. It's better to be safer than sorry, though. Murphy's Law dictates that popping them will see your favourite petal shatter.
The balloons should come away cleanly as they slowly deflate. Occasionally some will need encouragement and you will have to push on them to expel the rest of the air, and will need to gently pull at them to release them from the chocolate.
Now all that's left is to choose your favourite petals and assemble them. You can use chocolate to glue them into place if you wish, but it is unnecessary. You can fill the centre bud with whatever you like. I was originally going to make some chocolate mousse but went with tinted whipped cream due to time constraints. Just make sure whatever you use is thick enough to hold the chocolate stamens in place!

You'll probably end up with lots of leftover petals. I ended up making two batches because I didn't like my first batch much. All the leftover petals make fantastic edible dessert bowls.

I filled them with cubes of chocolate mudcake, drizzled with leftover ganache, cream and strawberries.

Enjoy!


Seeing those last couple of photos put me into a food coma. =P
It was interesting to see you make these chocolate flowers. The result is very impressive.
That whole weekend put me in a food coma. We ate so much. I don’t think I’ve recovered my appetite since.
totally right! looks so easy anyone could do it! I love finding out something that looks intricate & hard is simple!
Totally agree! It’s such a painless technique – makes for a nice change!
yummy! must try out!
thanks for posting! 😀
Thanks for checking it out! Would love to see your results when you try it.
Beautiful! Thanks for posting this fantastic tutorial!
drooling
Oh how I’d love to live close by to be able to “incidentally” pop in and help you get rid of any left overs or things you made but disliked 😀
Great tutorial btw, the last photo is just killing me 😀
*wave* from Ninina-nini from dA
This is really awesome 🙂
But would you mind doing a tutorial on tempering chocolate? I hear about it everywhere, and I have no idea on how to do it or what it actually does.
I think it requires a candy thermometer or something, but I don’t have one. Do you have a technique for amateurs?
Thanks.
Next time I temper it I’ll be sure to take photos. It basically involves taking chocolate to a particular heat to change the molecular structure. But if you don’t have a candy thermometer there’s a cheating (inaccurate) method I use when I’m feeling lazy. You put 3/4 of the chocolate to be melted into a bowl and microwave it in 30 seconds bursts, stirring in between to keep the heat distributed. Once it’s just melted, you throw in the last 1/4 of the chocolate and stir for about 5 minutes. To test, dip a teaspoon into the chocolate and set it aside. It should set in about 30 seconds to a minute.
Thank you so much 😀
I’ll try that next time.