
“Don’t go to too much trouble.” These were the instructions handed to me when it came time to make a Father’s Day cake. Dark chocolate, light, fruity, and not too much trouble. I’ve never liked easy. But my favourite thing about mousse cakes is that they look a lot more complex than the actually are. The same can be said for mirror glaze. Most of this cake just involves pouring things on other things, but it looks like so much more than that.
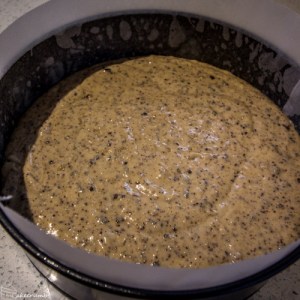
The first thing to do is start making all the layers. For the lighter part of the cake I decided on a sponge. But not just any old sponge, this one was a choc hazelnut sponge instead.


A little grated chocolate and hazelnut meal and the kitchen smelled amazing.

While that was cooling I started on the fruity part: the strawberry mousse. I used gelatin leaves for this but because it’s way easier to figure out how much you need when you’re not following a recipe.
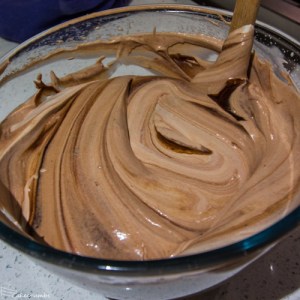
And lastly it’s time for the dark chocolate mousse to encase it all. The trick to the perfect mousse is whipping the cream just to soft peaks so you can fold it into the ganache without losing all the air you’ve whipped into it. If you take the cream too far don’t worry, all it means is that your mousse will be a little denser.

Once those three elements are done, its time to assemble! You can really do this in any order you want as long as the mousse surrounds it all. I prepared a cake mould for the mousse and covered the bottom of the mould.


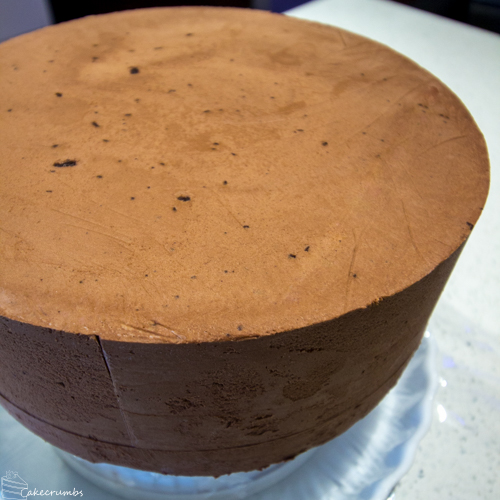
Next I dropped in half of the choc hazelnut sponge, followed by the jelly layer. I topped this with another small layer of mousse, the other half of the sponge and finally the rest of the mousse. All this I left to chill in the freezer overnight before unmoulding it.
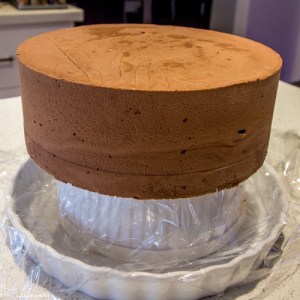
All that was left was to make the mirror glaze. It’s basically a white chocolate ganache with condensed milk and a little gelatin. While the mirror glaze is cooling you’ll need to set up your cake to be coated. You can either rest it on a cake rack or use an inverted cup or ramekin as I did. And lots of glad wrap to catch all the mess!

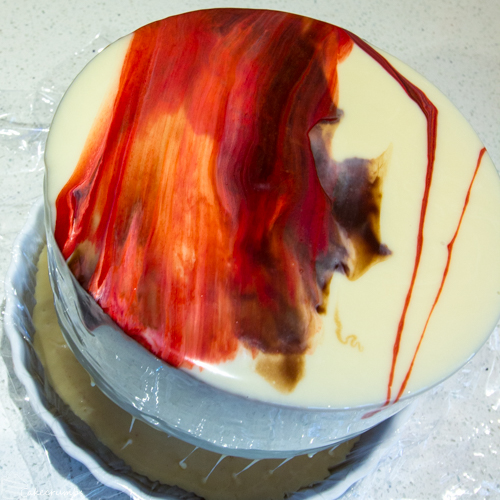
Pouring the glaze is the most incredibly satisfying part of the cake. Here’s where you can get as simple or creative as you want!
The glaze sets very quickly on the cool outer surface of the cake.

You might go in with a plan of what you want the cake to look like, but the fun of this glaze is that it takes on a character of its own.
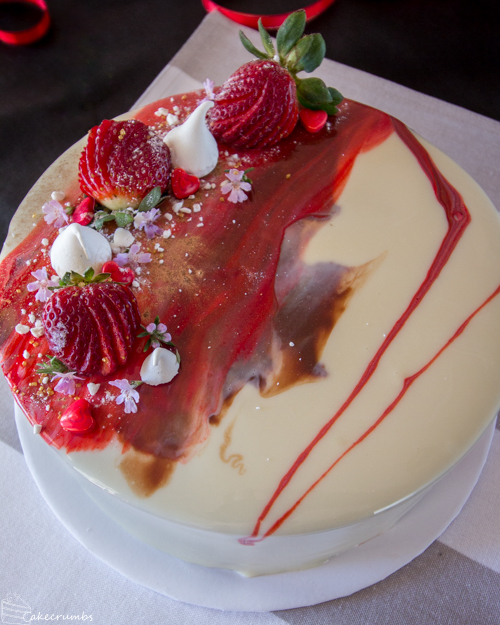
I didn’t want to add too much onto the top to distract from the patterning, but I did want to give a little hint to the strawberry layer inside.

I added a couple of strawberries, some rosemary blossoms and a little meringue to the top.
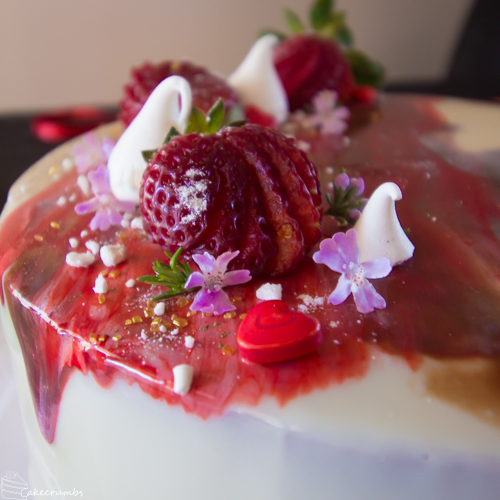
The glaze is definitely super glossy, as the name suggests. Its a little on the sticky side but nowhere near as much as you expect. When I rearranged a few decorations, for example, it held its shape in a way that ordinary ganache just does not.

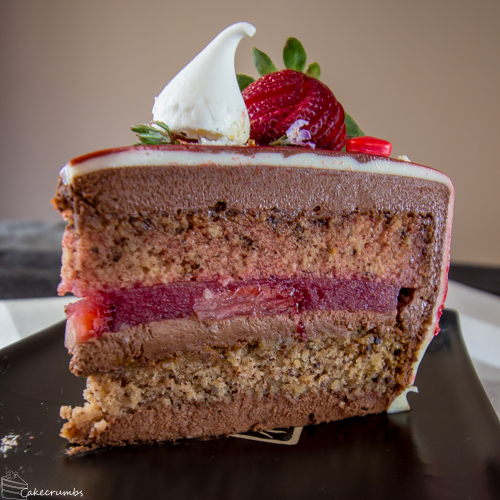
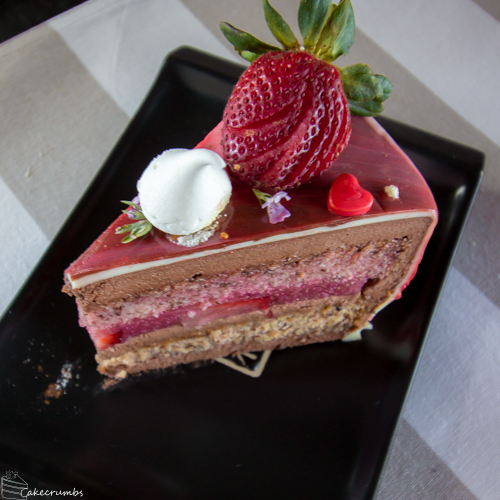
But of course the exciting part is cutting into it and seeing if all the layers worked! It unmoulded just fine and survived the entire trip to my partner’s family’s house. Phew!
Here’s how to make your very own!
Strawberry and Choc Hazelnut Entremet w/ Mirror Glaze
A fresh, fruity and chocolatey dessert that's sure to impress!
Note: You will need a cake ring, flexible cake mould or a cake tin lined with plastic wrap for this recipe. I used a 22cm cake ring lined with acetate. There are a great many different types of gelatin leaves of different strengths and sizes. I used silver strength gelatin leaves, but if in doubt use as many as the packet says is required to set 250ml of liquid.
Ingredients
Choc Hazelnut Sponge- 3/4 cup (115g) plain flour
- 1/2 tsp bicarbonate soda
- 50g dark chocolate, grated
- 1/4 cup (25g) hazelnut meal
- 90g unsalted butter, room temperature
- 1 cup (220g) caster sugar
- 1 tsp vanilla extract
- 2 eggs, separated
- 3/4 cup (175ml) buttermilk
Strawberry Jelly
- 250g fresh strawberries (plus extra for decorating)
- 15ml maple syrup
- 3x gelatin leaves (or according to packet instructions)
Chocolate Mousse
- 2tsp powedered gelatin
- 2 tbsp tepid water
- 250ml milk
- 350g dark chocolate, chopped
- 600ml thickened cream
Mirror Glaze
- 1/2 cup (125ml) tepid water
- 25g powdered gelatin
- 1.5 cups (300g) caster sugar
- 1/2 tin (200g) condensed milk
- 140ml water, extra
- 350g white chocolate, chopped
- gel food colouring [optional]
Directions
Choc Hazelnut Sponge
- Preheat oven to 180°C (355°F). Grease and line a 20cm cake tin.
- Mix together sifted flour, hazelnut meal, bicarb soda and grated chocolate. Set aside.
- Cream the butter and sugar together until light and fluffy (approx 5 minutes). Beat in the vanilla and the egg yolks one at a time.
- Fold in the flour mixture and buttermilk into the butter mixture a third at a time.
- In a separate bowl, whisk the egg whites to soft peak. Fold the egg whites into the flour mixture until just combined.
- Pour mixture into the cake tin. Bake for 35-40 minutes, or until cake has shrunk slightly from the sides of the tin and springs back when gently touched.
- Cool in the cake tin for 20 minutes before turning onto cake rack to cool completely. Slice in half and set aside.
Strawberry Jelly
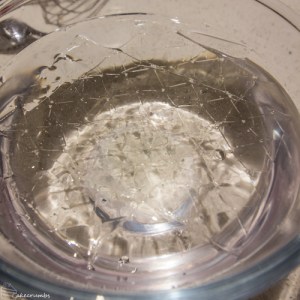
- To make the jelly, soak the gelatin leaves in cold water for 5 minutes.
- Meanwhile, remove the leaves from the strawberries and blend into a smooth puree. If you’re picky about the seeds you can sieve them out.
- Combine the strawberry puree with the maple syrup in a small saucepan. Heat the mixture over medium heat, stirring, until it just begins to boil. Remove from heat.
- Squeeze the excess water from the gelatin leaves. Add to the strawberry puree and stir until combined. Pour the mixture into a 20cm cake tin lined with plastic wrap. If desired, add extra slices of strawberries to the tin for decoration.
- Place the tin the the freezer on a flat shelf until completely set.
Chocolate Mousse
- For the mousse, combine the gelatin and tepid water together in a small bowl until gelatin blooms
- Heat the milk in a medium saucepan until warm (do not allow to boil); add the bloomed gelatin and stir until dissolved.
- Put chopped chocolate into a bowl; pour milk/gelatine mixture over the chocolate and stir until chocolate has melted.
- Whip cream to soft peaks. Fold 1/3 of cream mixture into the mousse to lighten; fold in the rest of the cream in two batches until just combined.
Assembly
- To assemble, prepare your cake ring, cake tin or cake mould.
- Pour a small portion on the mouse to cover the base. Add one half of the sponge layer, followed by the jelly layer. Add a quarter of the mousse to cover the jelly layer and fill around the sides. Finally, add the last layer of sponge cake then the remaining mousse to cover.
- Place cake in the freezer until completely frozen though. Unmould the cake just before pouring the glaze.
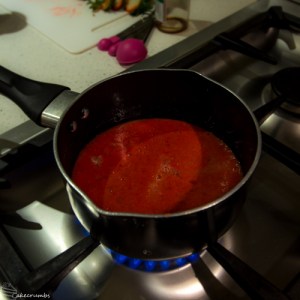
Mirror Glaze
- Combine the half cup of water and the powered gelatin in a small bowl until the gelatin blooms. Place the grated white chocolate in a large bowl and set aside.
- Meanwhile, in a medium saucepan, combine the sugar, condensed milk and remaining water. Heat mixture over medium heat until it’s simmering steadily (if you have a candy thermometer about 100°C is ideal). Remove from heat, add the bloomed gelatin and stir until dissolved.
- Pour the mixture over the white chocolate, stir gently to combine. Take care not to stir too vigorously so as not to add air bubbles to the mixture.
- Allow glaze to cool to around 30-35°C. At this point it will feel warm to the touch and will coat the back of a spoon. If the mixture cools too much to pour it can be gently heated again.
- If adding colour, divide mixture into small bowls and gently stir in the gel food colouring. Colour can also be added to the palette knife in the last step.
- Remove the mousse cake from the freezer and prepare it for pouring either by placing it on a cake rack or an overturned ramekin.
- Pour the glaze over the top of the cake, completely coating the top and sides. If the glaze drips too quickly and is too thin it hasn’t cooled enough. If its thick and doesn’t drip, its too cold and needs to be gently heated.
- Once the cake is coated with the base colour glaze you can add dollops of other coloured glaze. Leave it to drip as is, or use a palette knife to spread the colours and smooth the top.


I’m so glad you’re back! I don’t know why but I find your posts really relaxing and cathartic to read!? Random but thanks for sharing 🙂
That means a lot to me, thank you ♡
The cake looks wonderful!
Also, I’m very happy you’re posting again, this is one of my favorite sites when in need of cake-making inspiration 🙂
Thank you so much! Its been so long that I was sure I’d have no readers left so it means a lot to have you along ♥
Pingback: Honey Passionfruit Entremet | Cakecrumbs
Why can I not print your recipes, all the photos and recipe come up but to print them I can get 1 page and nothing else. Your cakes and desserts are to die for, for a cake and dessert lover and would dearly love to try making some of them.
I’ve just started using the WordPress recipe shortcodes which are supposed to make the recipe printable (I’d dearly love to use the actual plugins, but I’d have to pay for the $400 a year plan). Let me look into it and see if I can help. Is it the whole page you’re trying to print or just the recipe?
I recently made this cake for a friend and it came out really well! It was really delicious, I especially liked the strawberry layer with the sweetness of the cake. Thank you for the recipe!
Thank you so much for your feedback. I’m glad you liked it!
How long can the unglazed cake be frozen for?
Hi Evelyn. Apologies for the very belated response (I’ve been absolutely neglecting this blog lately) but figure it would be worth answering in case someone reading this later has the same question. But the answer is a really long time! If it’s in an airtight container you’d probably have a good 6 months before you start getting the freezer burn taste, so realistically much longer than you’d likely need to. So if you want to make the unglazed cake a few days or even a week ahead it would be absolutely fine.
Hello, got my cake in the freezer now, I love baking and I haven’t made a cake like this before so thank you for the detailed instructions. I hope mine looks half as good as yours, got friends for dinner tomorrow so fingers crossed! I do have one question once I’ve done the glaze (when the cake is frozen, straight from the freezer) how long does it need to stand/defrost before it’s ready to eat? Thanks very much
Hello, my cake is in the freezer at the moment, I love baking but haven’t made a cake like this before so thank you for the detailed instructions. I hope mine looks half as good as yours, got friends for dinner tomorrow so fingers crossed! I do have one question, after glazing the cake, straight from the freezer, how long does it need to stand/defrost before it’s ready to eat? Thanks
Hi Jennie. It’s a little difficult to say as it’s going to depend upon so many factors, like your ambient temperature. But at a rough guide you will probably want to do around 6 hours at room temperature, or overnight in the fridge. I find most of the layers defrost pretty quickly, but the jelly layer has so much water content that it takes a bit longer to defrost.
A quick note that 30-35 degrees for the mirror glaze was way too low – it was gloopy and didn’t pour properly. Doing it again, I’d have ignored the temperature and just based it on the description. Everything else was awesome though!