
Last Saturday, my boyfriend and I celebrated out 6th anniversary. Where there's a celebration, there's gonna be a cake.
Being so close to Valentine's Day, it's often difficult to think of different and unique present, card and cake ideas. Both of us consider our anniversary as the real celebration, with Valentine's being more of a warm up of sorts. Valentine's is another excuse to do something a little special for each other, but we both feel it's more of a Hallmark holiday. The 16th of Feb is that day that really means something to us, and in turn I try to save the special stuff for that day. We also don't really want to have to deal with two cakes to finish, either.

This year, having just got back from our holiday I didn't have a lot of time to brainstorm, nor had I had the chance to replenish my cupboard with groceries. I had to make do with what was on hand, so I raided the pantry and fridge for odds and ends to throw something together. I didn't have enough cream cheese for a cheesecake (his favourite), but enough for some cream cheese icing (his favourite icing). Red velvet cake was the next logical conclusion.
The beauty of red velvet cake is it is the simplest cake to make. There's no creaming or folding or any delicate processes with making the batter.
You simply sift all the dry ingredients together.

Whisk all the wet ones together.

Pour the wet into the dry and whisk.

I like to leave the colouring to last. I have seen recipes that call for as much as what would equate to two bottles of food colouring. I detest that thought for starters, but also find it really unnecessary. The amount needed differs based on the type of food colouring and the type of cocoa used, but I get nice results from a minimal amount. I just add enough to get that deep colour in the batter. This time took about a tablespoon of liquid food colouring. If I use gel paste it's more like 1/4 of a teaspoon. Keep in mind that you do lose some colour during baking, so you want your batter to be vivid red.

All that's left is to pour it into your tin and bake. It's that's simple.

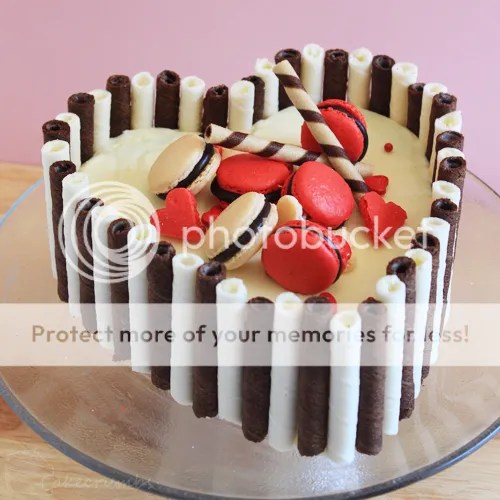
Of course, I chose a heart-shaped tin for the occasion. Tin sizes will alter how long it has to bake for. I have a terrible habit of roughing it: throw it in the oven for 50 minutes, then check to see how much longer it needs. It's usually about an hour.

I covered the cake in the cream cheese icing then began to decorate. I still has some frozen macaron shells in the freezer from Christmas so I filled a few with vanilla tea-infused dark chocolate ganache, and cut some heart shapes out of some others. There are 6 macarons, 6 macron hearts, and 6 heart-shaped lollies adorning the cake. I felt like physically adding the number 6 to it would detract from the look, so instead I made the reference to our anniversary more subtle.

Finally, I added some cookies & cream and vanilla wafers around the outside, as well as a few smaller ones on top. I debated adding a ribbon to the exterior, but it probably didn't need it.
Now, to dissect the heart…

He loved the cake, and loved eating it even more. He took me out for dinner to celebrate our anniversary, and when we came home he cut himself a slice of the cake. Then went back for another slice. So I guess he wasn't lying when he said he liked it!
|
Red Velvet Cake |
|
Ingredients |
|
1 1/4 (190g) cups plain flour Cream cheese icing |
|
Method |
To make the icing, beat the cream cheese and butter until light and fluffy. The longer you beat the mixture, the whiter it will become. Beat in the vanilla essence, then gradually beat in the icing sugar until well combined. |
You'll find the printable version of this recipe here.


This is just so simple and beautiful!
Thank you. 😀
Love your recipe, as always. I really want to try this one!
Thank you! It’s hard to go wrong with this one. 😉
Do I need the white wine vinegar and the buttermilk? Can I leaf that out or exchange it with sth?
I enjoyed it the next few days too! Thanks so much for making this for me and for our 6+ years together. I loved how the cake looked and the symbolism.
=)
Pleasure is all mine. ♥
The vinegar can be substituted with lemon juice or any citrus/acidic juice. Buttermilk is easily made by adding a tablespoon of lemon juice or vinegar to a cup of milk and leaving it to stand for 15 minutes. I always use vinegar in the cake because I use lemon juice to make the buttermilk, but they are interchangeable.
You are such a great help. Thank you!
My pleasure. :]
This cake would also do as a Red Queen representation. At least it reminds me of Alice’s Red Queen. I love it. Will make sure to bake it some time. Do you remember what food colouring you used exactly?
I believe it would have been Queen’s pillar box red liquid food dye.
Pingback: TMNT Birthday Cake | Cakecrumbs