
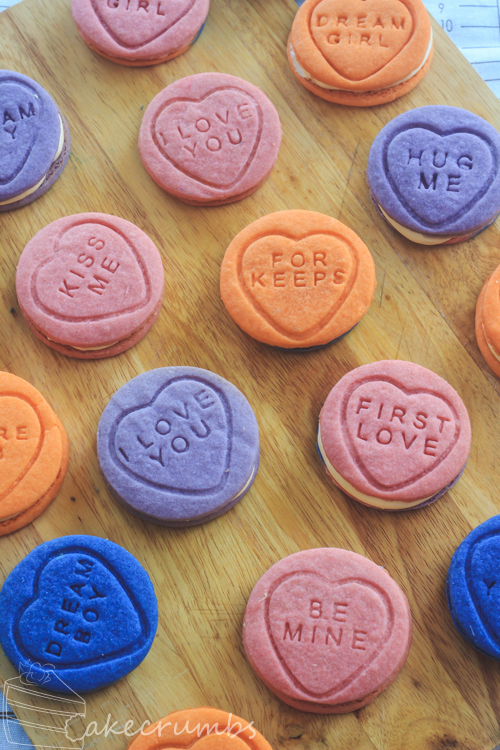
When I was a kid one of the great joys of school was heading to the canteen at lunchtime to buy a packet of lollies. I don’t eat many, if any, lollies these days, but I have such an emotional attachment to those I had as a kid. There’s almost more nostalgia-factor attached to these than anything else. One of the most popular lollies were the sherbet-ty lollies called Love Hearts. There’s a few variations of this lolly. In some places they’re called Sweet Hearts, in others they’re called Conversation Hearts. But we all recognise these little heart-shaped lollies with their corny little lovey sayings emblazoned on them. What better time to recreate them in cookie form than for a Valentine’s Day treat?
Recently I’ve been experimenting a lot with making custom cookie cutters. I’ve gotten into 3D modelling and printing as part of my cosplay/prop building hobby. I started bringing these skills across into my baking hobby, but I never quite knew how to approach it as far as the blog went. How do I custom make a tool to use and then post it here without a way to replicate it?
So I’ve started a little Etsy Shop. It’s cosplay resource heavy at the moment, but as I post the cookies here I’ll also be providing the tools I made for sale there. Some ideas, such as these, will be a bit easier to replicate using standard cookie tools than others. But the option will be there should you desire it.
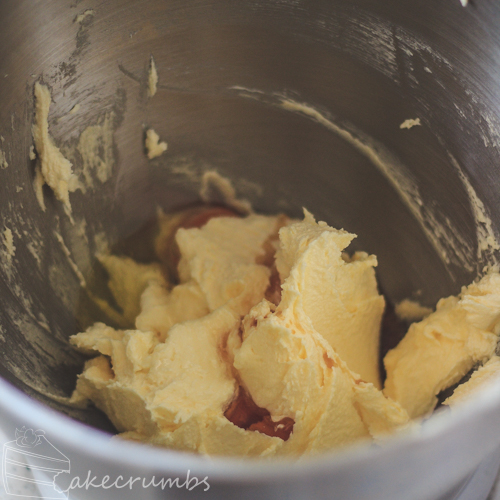
Cookies such as these are best made with a good sugar cookie dough that is chilled and doesn’t spread. There’s plenty of recipes claiming to be the best sugar cookie dough ever. But at the end of the day you’re simply looking for a good 1:2:3 recipe (sugar:fat:flour), or a 2:2:3 for a bit of a sweeter cookie. The dough is usually made by the creaming method. That is, beating the sugar and butter together first, usually followed by egg, flavouring and then folding in the flour.


I’ll be providing the recipe I used further down, as usual. But I get asked all the time how I stop my cookies from spreading all over the place and the answer is really as simple as knowing a good recipe.
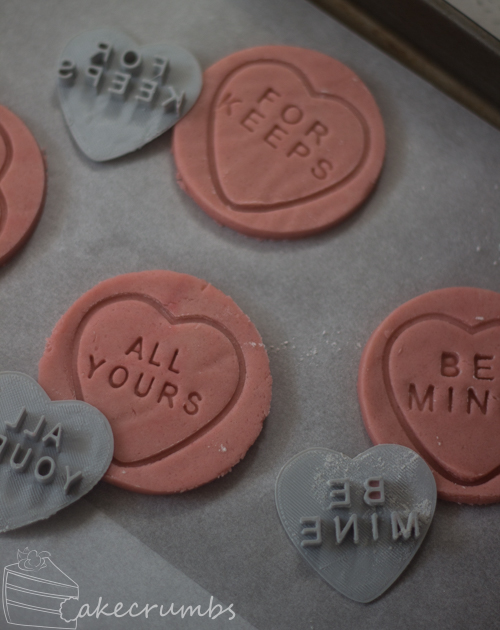
Once the flour was folded through, I separated them into quarters (truthfully the stand mixer did that for me) and dyed them 4 different colours with gel food dye.


After some time to chill in the fridge it was time to see how the little embossers I’d made went. I found that working from the inside out made for a much smoother result. If I cut them with the circle first the embossers would crack the perfect circle shape.


A little dusting of flour and a gentle rocking motion ensured they didn’t stick, but overall they were pretty easy to use. They were best when the dough had had a good minute to cool and become malleable: very chilled dough required a bit of a firm push to get through.
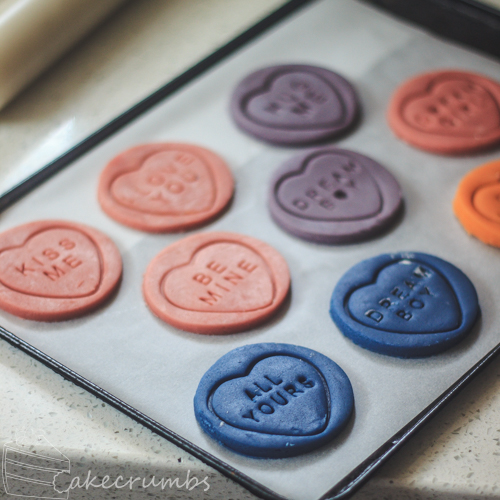
After a short time in the oven they were all ready. I was absolutely thrilled with how they came out.
They could have been done there. But in the absence of icing I wanted to make them a little more special seeing as they were a Valentine’s gift. And there’s nothing my Valentine loves more than custard. I made a quick little vanilla custard and left it to cool to room temp.

I then beat in a block of cream cheese to make the custard filling for the biscuits.

I piped a layer of it onto half the biscuits and then sandwiched them together.
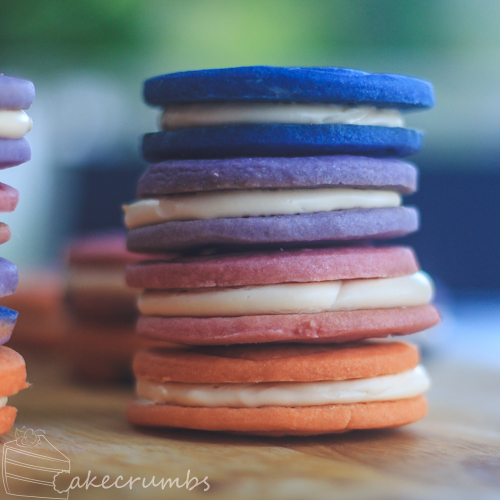
There’s always plentiful baked goods around the house, but this is one of the first things in a long time I’ve seen Cameron get really excited for. He loved the filling and couldn’t wait to get home after Valentine’s dinner to have another, with a level of enthusiasm that surprised even me! After some time in the fridge the biscuits absorbed the moisture and became cakey and he loved that even more.

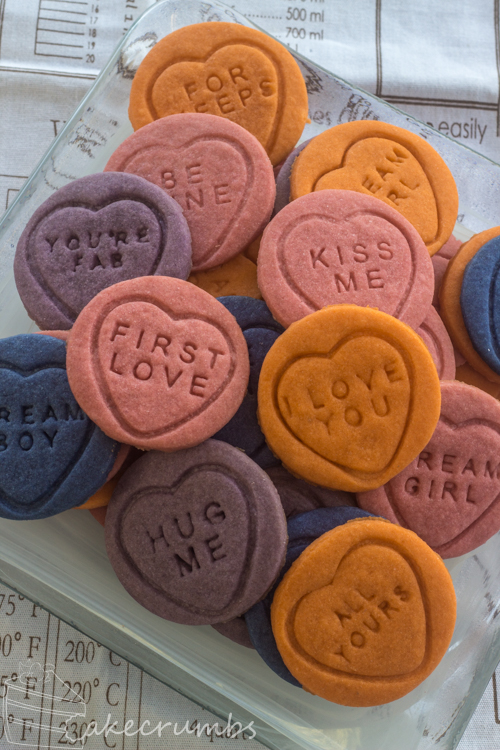
I had a lot of fun making these embossers true to the lollies we used to have in the playground. The absolutely cheesey messages. The random couple of lollies that had an entirely different font to the others. And those *quintessentially* 90s sayings.

But at the end of the day there was really only one message I wanted to convey…

Here’s how I made them!
Love Heart Cookies
Simple sugar cookies sandwiched with a custard filling.
Ingredients
Sugar Cookie Dough • 250g unsalted butter, room temperature • 220g caster sugar • 1 egg, room temperature • 1 1/2 tsp vanilla extract • 375g plain flour • 3/4 tsp baking powder • 3/4 tsp salt • gel food colouring (optional) Custard Filling • 2 tbsp custard powder • 2 tbsp white sugar • 250ml milk • 1/2 tsp vanilla extract • 250g cream cheese, room temperatureDirections
-
Sugar Cookie Dough
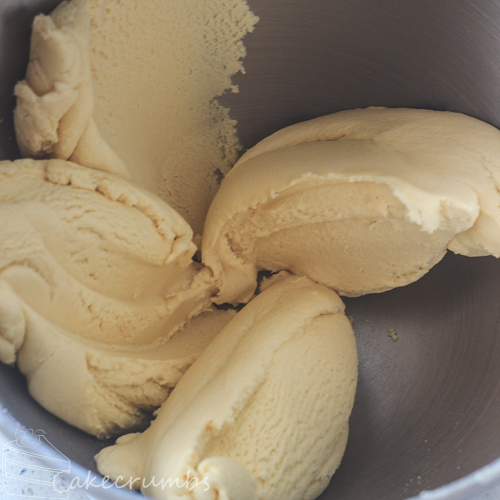
- In a medium bowl, beat the butter, and sugar until light and fluffy, and well combined. Add the egg and vanilla and beat until combined. Sift the baking powder, salt and sugar together, then fold into the butter mixture a third at a time. If colouring, fold it into the dough as well.
- Divide and roll the dough between 2 sheets of baking paper until about 5mm thick. Chill in the fridge for at least an hour, ideally 2-3 hours.
- Preheat oven to 175°C (350°F). Line a baking tray with baking paper.
- Emboss the dough with the lettering, then the heart shape, then cut out with a 6cm round cutter. Place on the baking tray. Chill in the fridge again for 30 minutes before baking to minimise spreading
- Bake for 8-10 minutes, or until cookies are firm. You can rotate the tray 5 minutes in if you’re having issues with browning too much on one side. Allow the cookies to completely cool on the tray before transferring to a rack to cool completely.
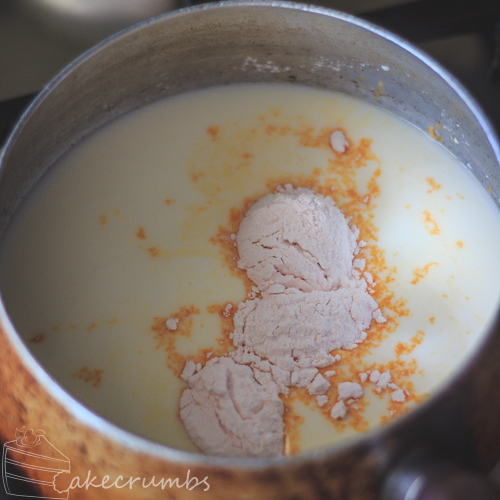
- In a medium saucepan, combine the custard powder, sugar, milk and vanilla; stir over medium heat until mixture boils and thickens. Remove from heat, cover with plastic wrap and allow to cool to room temperature.
- Beat the cream cheese into the custard mixture until smooth and well combined
- Pipe or spread onto half of the cookies and sandwich with the other half.


Would you ship the conversation cookie set you have on etsy to california? It is wonderful!
Thank you. Indeed, Etsy ships world wide! 🙂
These look really nice, awesome idea with the cookie cutters!
Thank you!
Pingback: Sweet Hearts Cupcakes | Cakecrumbs